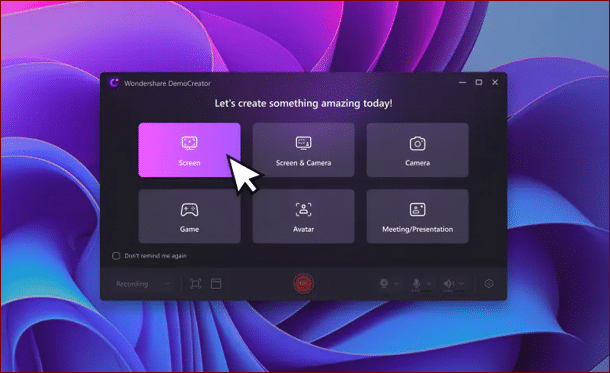
In the gaming universe, keeping a memory of your gameplay is not just only about saving memory; it is about sharing, making tutorials, and even among the audience, creating a gamer community. Wondershare DemoCreator is a highly capable tool that helps gamers in this process as it provides them with a one-stop option for recording, comminution, and sharing gameplay clips. So let’s start and see how to record gameplay on pc.
Part 1: Preparing for your recording session
Before diving into details regarding how to record gameplay on pc, it’s essential to set the stage for optimal performance:
Setting up Your Gaming Environment: Make sure your computer can run the games and recordings at the same time without an impact on the performance. Shut down unneeded apps located in the background and remove these from your screen to help free up system resources and help you focus on the game.
Introduction to Wondershare DemoCreator’s Features: DemoCreator will ensure that your demos will be professional due to its features designed to improve the quality of your recordings. The features packed for this purpose include the personalization of recording modes, real-time editors, and compatibility with some of the top gaming systems.
Part 2: Step-by-step guide to using Wondershare DemoCreator Screen Recorder
Now let’s walk through the process of recording your gameplay using Wondershare DemoCreator. It is undoubtedly the best way to record gameplay on PC:
Step I : Downloading & Installation
Go to the official website for downloading and installing Wondershare DemoCreator. Follow the on-screen step-by-step here in which DemoCreator will be added to your PC.
Open the application after it is loaded onto the computer.
Step II : Adjust the Parameters of Your Recording Process

Step III : Starting your recording with DemoCreator
Adjust your recording settings first, and then choose to start the game application. The recording frame of DemoCreator can be placed on the game window. Press the start recording button to begin recording the stuff that you are playing. DemoCreator will record your gameplay with 4K/8K resolution at up to 120FPS, regardless of your monitor resolution. Use DemoCreator’s live editing apps where you can wonder, unpause, or keep a record as often as it’s needed.
Step IV : Tips for Recording High-Quality Gameplay
- Check out and make sure your system is eligible for gaming requirements and recording.
- Use hardware acceleration whenever it is available to try to mitigate performance impact during a recording.
- Have a close look into lighting as well as at audio quality in your environment as you aim to make your recordings as high quality as possible.
- Be creative and experiment with various techniques of recording, for instance, the moments of a certain gameplay or the capture of the entire playing time, by yourself.
With your DemoCreator, recording gameplay becomes a breeze. Although this is a challenging task, everything is set up to make this adventure a pleasurable and rewarding one. Regardless of whether you are a strategic user who wants to share his experiences or a passionate video creator who makes every effort to keep the community growing, DemoCreator gives you the instruments you need to be a Cavalier in the world of gaming.
Part 3: Editing your Gameplay recording
Once you’ve captured your gameplay footage, it’s time to elevate it to the next level with Wondershare DemoCreator’s editing capabilities: Once you’ve captured your gameplay screen with this screen recorder, it’s time to elevate it to the next level with Wondershare DemoCreator’s editing capabilities:
- Basic Editing Features: DemoCreator provides a minimal set of editing tools like cutting, dividing, and combining your gaming videos so you can produce the best result by just using simple techniques. Such abilities allow you to finely edit your film and eliminate all unwelcome parts of it finally making a product with a great outcome.
- Adding Effects, Texts, and Transitions: The video of your gameplay promotion also your gameplay aesthetics very essential. Incorporate effects, texts, and miscellaneous into your video. DemoCreator has a rich palette of add-on effects and touchy texts which you can use to give your video a new and creative look to make it interesting to your audience.
- AI Tools Integration: Utilize DemoCreator’s available AI features such as Auto Caption, AI Text to Speech, and AI voice changer to include some personalized effects into your gameplay video shot. Auto-Caption provides citations for your video-to-text AI Text-to-Speech implementation that creates a natural voice. While AI voice changer is a tool that does real-time voice modification. It can add a bit of fun to your commentary.
Conclusion
By following the steps outlined in this guide, users can effortlessly record gameplay on pc while leveraging DemoCreator’s advanced features to edit and customize their videos to perfection. From basic editing tools to AI-powered enhancements such as Auto Caption, AI Text to Speech, and AI voice changer, DemoCreator offers a wealth of options to elevate gameplay recordings and make them stand out. With the ability to share their creations across various platforms, gamers are encouraged to unleash their creativity and connect with a broader audience. Whether you’re a casual gamer or a seasoned content creator, DemoCreator empowers you to share your gaming adventures in stunning detail and forge meaningful connections within the gaming community. So, why wait? Dive into the world of gaming content creation with Wondershare DemoCreator today and let your gameplay recordings shine.


Click here to change your cookie preferences